How to deploy a React app with Netlify and set up continuous deployment via Github

So far I have only used Heroku to deploy my web applications. Well, that changed today as I decided to branch out and try a different deployment service. I love Heroku, and it is so easy to use, but I hate how my applications go to sleep after 30 minutes of inactivity unless you pay a monthly fee. The sleeping application then takes 30 seconds to “wake-up” which feels like forever from a client’s perspective.
I decided to try Netlify after witnessing many other developers use this service to host their applications. I saw some pretty good reviews about Netlify, and from what I read my applications won’t be going to sleep anymore! 😴 😊 Here is a link to an article I read titled, “13 reasons why you should be using Netlify”. In this article, I’m going to show you how to create a React app, deploy it to Netlify, add the project to Github, and lastly connect the Github repo to the Netlify app. This will allow for continuous deployment. Every time we push updates to Github, the Netlify app will update to the most current project or repo. Shall we begin?
Step 1: Create React App and
We will start off by creating a new react app. I will name my app “netlify-demo”. Below are the commands to create the React app. This step should be familiar and simple.
npm install -g create-react-app //This step can be skipped if needed
create-react-app netlify-demo
cd netlify-demo
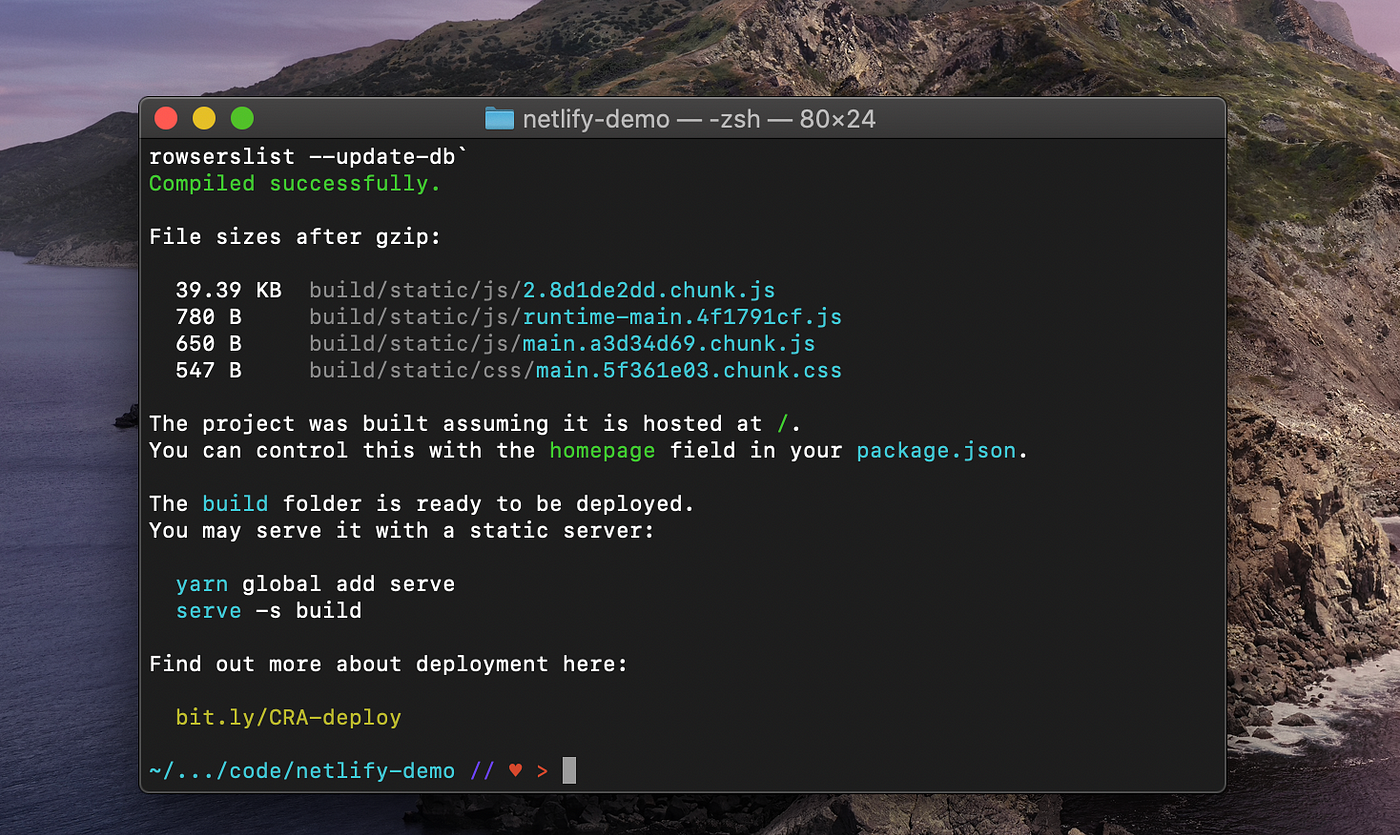
npm run buildHere is a screenshot of what your terminal should look like after entering the above commands.
Step 2: Install Netlify CLI and Deploy
Time to install Netlify CLI to deploy our application to Netlify from the terminal. Below are the next commands we will need to execute.
npm install netlify-cli -g
netlify deploy
After entering netlify deploy, you will be prompted with a question. Choose “Create & configure a new site”. Below is a screenshot.

Choose a name for the team. I’ll choose Gene Campbell’s III team which is the default option provided.

Next we will be prompted to enter a site name. This can be updated later. I’ll enter “netlify-demo-123”.

If the site name is available and within the parameters, you will be prompted with another question. We will have to enter a publish directory. Type in “./build”, and hit enter.

This should complete the process, and you will be able to access your live app at the Website Draft URL.

Copy and paste this url into your browser to see the app! Below is a screenshot of my app in the browser.

We now have our app set up for deployment with Netlify! Next, we will create a repo on Github and push our project to Github.
Step 3: Create Github repo and push up current project
I will now navigate over to Github’s website to access my account. I’ll create a new repo for the demo.

Complete the form to create the new repo.

Next, just follow the instructions displayed. Copy and paste the first option.

I will now open Visual Studio from the terminal using the shortcut below.

Once Visual Studio opens up, open the terminal and paste in the commands from above(They can be entered in all at once).

If you run a git status after the commands are finishing running, you will notice the netlify folder isn’t committed yet. We will run the following commands below, and then we are finished with Github for now.
git add .
git commit -m'add netlify folder'
git push
Refresh the repo in the browser, and you should see all the updates.

If so, we can move onto the final piece, connecting the repo with Netlify app.
Step 4: Set up Deployment settings for Netlify App
Head to Netlify’s website and access your personal dashboard. You should see your application listed in the sites section. Click the application. It should look like the image below.

We will click site settings to access the deployment settings. Select Build and Deploy. Your screen should look like the screenshot below.

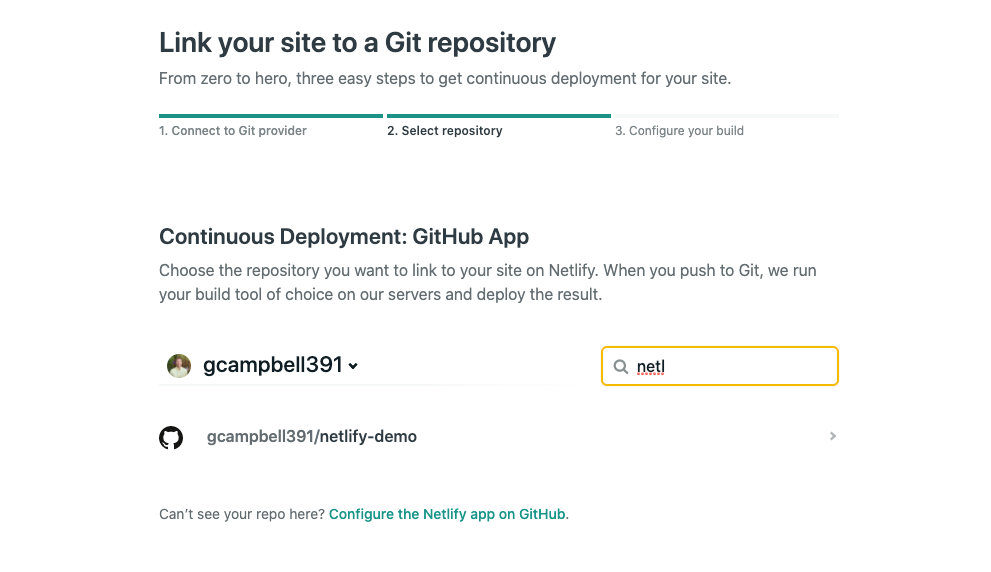
Next, select “Link site to Git”. Choose “Github”. Choose the correct repo in the list. You can use the search filter if you like. I definitely did!
After you find the correct repo, click it. Below is a screenshot of how I configured my build.

I choose master for the branch. I had trouble getting my react app to run without adding the following “CI=” to “npm run build” in the build command. Here is a link to the article that helped me find the issue and solution. Click “deploy site” if your form looks like mine above.
You should now be brought back to the overview project screen.

You will notice under the app name that site deploy is in progress. You can click the yellow text to view the actually terminal as the the site is being built and deployed. If deployment is successful, green text with a link to your web app should replace the yellow text under the app name.

Click the link to access the web app.

And just like that we have everything set up! Now every time we push up new git commits for this project, Netlify will pull and deploy the most current repo. For the last step, I’ll show an example of this.
Step 5: Make some changes to the project, push up the commits, and see the results
For a quick demonstration, I will delete everything inside the header tag on the App.js file. I will replace the deleted content with a h1 tag that reads “Yo, We did it!”. Below is a screenshot of my changes before I commit and push them to Github.

I will now add, commit, and push the updates to Github. After the commands finish running, navigate back to the Netlify website. Click the Deploys section in your dashboard, and you should see a new build being made. You can also see the my commit message associated with the update.

Once the build is complete, let’s refresh the live app link.

Wahoo! Our live application is now running on the most current version. If you ever want to make changes to the application in the future, just add, commit, and push your changes to Github. Netlify will handle the rest!
I hope you found this article helpful, and easy to understand. If you have any questions please feel free to reach out to me on LinkedIn. You can also check out my portfolio site here. Have a great day!


Comments
Post a Comment